Follow this step by step guide to learn how to enable visitors to subscribe for your wordpress blog.
Don’t forget to check out our site for more free how-to videos!
– our feed
– join us on facebook
– our group in Google+
User subscriptions can be handled in many ways. In this tutorial, we will be discussing a couple of common ways of subscription. One way to do so is by RSS Feeds while the other is by Email Subscriptions.
In this tutorial, we will teach you how to subscribe wordpress blog.
Step 1 — Feed Burner
First of all, you need to go to feedburner.com. Over here, sign in with your Google Account.
Step 2 — Specify the blog’s Address
Once you have signed in, a welcome page will open up. In the welcome page, type your wordpress blog’s address under the field titled ‘Burn a field right this instant’. Once you are done, click on the NEXT button.
Step 3 — Identify the Source
With that done, another page will open where you will be asked to identify your feed source. Choose the first option and Click on the NEXT button.
Step 4 — Feed’s Title and address
As a result, a new page will open up. Here, you can modify your feed’s title and address. For the purpose of this tutorial, we will leave it as it is. Click on the NEXT button to proceed further.
Step 5 — Feed’s URL
In the new page, you will be congratulated and will be displayed with your feed’s address. Simply copy the address and sign in to your dashboard.
Step 6 — Add a new plugin
Now we have to add a plugin in our wordpress site. In order to do so, go to the plug-ins tab and click on the Add new button.
Step 7 — Install a Plugin
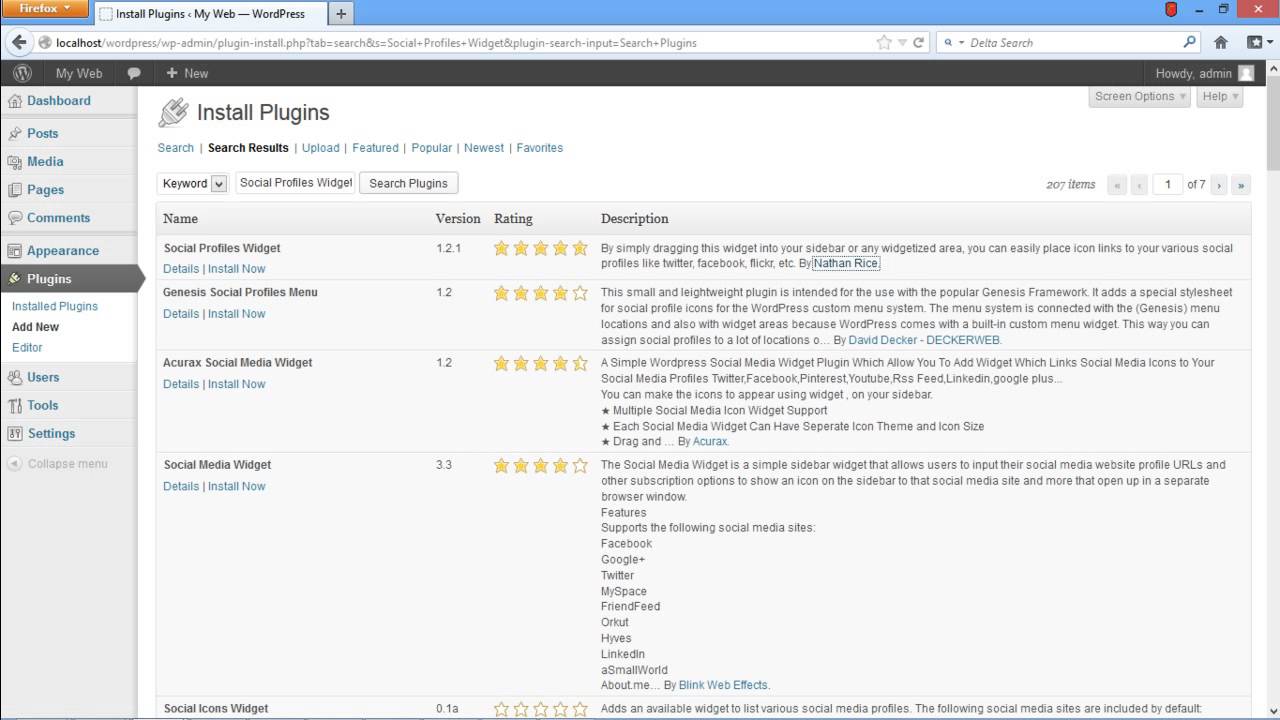
In the Search field, type “Social profiles Widget” and hit Search button.
You will get a list of widgets in the search results; choose the one by the writer “Nathan Rice”. Click on the Install Now button.
Step 8 — Go to Widgets
You will be displayed with a confirmation message. Click on the ok button to proceed.
Once the installation has completed, click on the Activate Plugin option.
Now go to the Appearance tab and click on Widgets.
Step 9– Add a widget
With that done, find “Social Profiles” under the Available Widgets and click on Add.
Step 10– Configure the Widget
Now give a suitable title to your widget and paste the address given by feed burner under RSS/feed burner URL. Once you are done, click on the Save Widget button.
Now visit your blog and you will notice the RSS Feed icon and the title you gave to the widget. Click on the icon and a new page will open where you can see your blog’s feed.
This was all about the RSS Method.
Step 11 — Publicize Email
Now we will teach you about the Email Subscription Method.
For this, you will have to open feedburner.com again and click on your wordpress blog’s Title.
As a result a new page will open up. Over there, click on Publicize tab and then click on the “Email Subscriptions” option. After that Email Subscriptions page will open up.
Just click on the Activate Button below to activate this feature.
Step 12 – Subscription Link
As a result, another page will open up. From here, copy the Subscription Link from the “Preview Subscription Link ” section and then move back to your wordpress dashboard.
Step 13 – Add text Widget
Now you have to use a text widget to insert the Subscription link. For that, go to your dashboard and open Widgets under Appearance tab.
From the available widgets, find the “Text” widget and click on the Add button.
Step 14 – Set up text widget
With that done, the text Widget will open up. Give it a suitable title which you want your visitors to see. Next, Paste the copied Link in the text field and Save the Widget.
Now visit your blog and you will notice the Email Subscription Link. Click that link and a new page will open up where visitors can subscribe to your blog after entering their email addresses. And this was all about how to subscribe wordpress blog.
source

